
React Navigation 自定义 Tab Bar(翻译)
2019-03-03
前言
本文的原作者是 Shihao Xia,文章源链接,我将其翻译为中文。
许多人在 React Native 应用中使用 React Navigation。React Navigation 为我们提供了许多开箱即用的 navigators。
其中 TabNavigator 是最重要的也是最常用的。
TabNavigator 非常灵活。在它的 API 文档中,它提供了几乎对 Tab Bar 所有方面的可定制性。
但是在文档中,只对如何自定义按钮图标、名称进行了讲解,并没有讲清楚该如何自定义 Tab Bar 本身。
例如,文档并没有告诉你,如何添加一个函数,来验证路由跳转时的有效性。也没有告诉你,如何添加一个特殊的 UI(比如在 Tab Bar 中央添加一个添加按钮)。
这些事情通过自定义 Tab Bar 都可以实现。
创建 Tab Bar
首先创建一个新文件,YourTabBar.js:
//YourTabBar.js
import React, {Component} from 'react';
import { View } from 'react-native';
export class YourTabBar extends Component {
    render(){
        return <View />
    }
}
假设 YourTabBar 就是你的自定义 Tab Bar,使用方式如下:
import { YourTabBar } from './YourTabBar.js';
export default TabNavigator(
  { ... },
  {
    tabBarComponent: YourTabBar,
  }
);
赞!现在你已经有了自己的 Tab Bar 了。不过显然是空的,只有一个 <View/>。
如果你向 TabNavigator 的 RouteConfigs 中添加配置,<YourTabBar /> 将什么也展示不出来。
下面我们来看,如何在组件中解析设置,并将它们合适地展示出来。
如果你在组件中使用 console.log(this.props) 打印 props,将会看到:
{
    activeTintColor: "...",
    animationEnabled: false,
    getLabel: function,
    navigation: object,
    navigationState: object { routes: array, index: 0, ...},
    ...
}
从中可以看出,我们需要的都被包含在 this.props 里面了。所有我们需要做的,就是从中取出我们所需要的。
下面是最终的代码:
import React from 'react';
import { Component } from 'react';
import {
    TouchableOpacity,
    Text,
    View,
    Image
} from 'react-native';
import { TabBarBottomProps, NavigationRoute } from 'react-navigation';

// just for ide hints
interface TabBarProps extends TabBarBottomProps {}

interface TabBarState {}

class TabBar extends Component<TabBarProps, TabBarState> {

    navigationStateIndex = null;

    // call when each time user click different tab
    // 当用户点击不同的 Tab 时会首先进入这个函数
    // 通过这个函数决定是否要拦截跳转
    navigationAvaliableFuncs: {
        [key: string]: () => boolean
    } = {
            //Account: this._needSignIn.bind(this),
            //Progress: this._needSignIn.bind(this),
        }

    // call when clicking tab got refused
    // 跳转被拦截后会进入这个函数
    navigationRefusedFuncs: {
        [key: string]: () => void
    } = {
            Account: this._refusedByNeedSignIn.bind(this),
            Progress: this._refusedByNeedSignIn.bind(this)
        }

    constructor(props: TabBarProps) {
        super(props);
    }

    /*  _needSignIn() {
        return !!this.props.authToken;
    } */

    /*_refusedByNeedSignIn() {
        const { navigation } = this.props;
        navigation.navigate('...');
    }*/

    // Main function to render tabbar
    // 这个函数用于展示 tabbar
    renderTabBarButton(route: NavigationRoute, idx: any) {
        // 从 props 中取出展示相关的属性
        const {
            activeTintColor,    // 活跃高亮色
            inactiveTintColor,  // 非活跃高亮色
            navigation,         // Navigation 对象
            getLabelText,       // 标题获取函数
            renderIcon,         // 图标
        } = this.props;
        // 获取当前 Tab 索引
        const currentIndex = navigation.state.index;
        // 判断使用哪种高亮色
        const color = currentIndex === idx ? activeTintColor : inactiveTintColor;
        // 获取标题
        const label = getLabelText({ route, focused: currentIndex === idx, index: idx });
        return (
            <TouchableOpacity
                onPress={() => {
                    if (currentIndex != idx) {
                        if (this.isNavigateAvaliable(label as string)) {
                            navigation.navigate(route.routeName);
                        } else {
                            this._onNavigationRefused(label as string);
                        }
                    }
                }}
                style={StdStyles.tabBarButton}
                key={route.routeName}
            >
                {renderIcon({ route, tintColor: color, focused: currentIndex === idx, index: idx })}
                // uncomment if you need title under tab
                {/* <Text style={[ StdStyles.tabBarButtonText, { color }]}>
                    {label}
                </Text>  */}
            </TouchableOpacity>
        );
    }

    isNavigateAvaliable(label: string) {
        const func: any = this.navigationAvaliableFuncs[label];
        if (func) {
            return func();
        }
        return true;
    }

    _onNavigationRefused(label: string) {
        const func = this.navigationRefusedFuncs[label];
        if (func) {
            func();
        }
    }

    render() {

        const { navigation, style } = this.props;
        const tabBarButtons = navigation.state.routes.map(this.renderTabBarButton.bind(this));
        return (
            <View style={[StdStyles.tabBar, style]}>
                {tabBarButtons}
            </View>
        );
    }
}

// Possible extension with redux
// function mapStateToProps(state: any) {
//    return {
//        ....,
//    }
// }
// function mapDispatchToProps(dispatch) {
//     return bindActionCreators(..., dispatch);
// }
// const _TabBar = connect(mapStateToProps)(TabBar);
// export { _TabBar as TabBar };
其中:
- 为帮助理解,我添加了一些中文注释
- 代码中包含有拦截器逻辑,这个非常有用
现在你的自定义 Tab 就可以正常工作了!
向 Tab Bar 中添加按钮
如何向 Tab Bar 中添加特殊按钮呢?
比如像下图这样,添加一个照相机按钮:
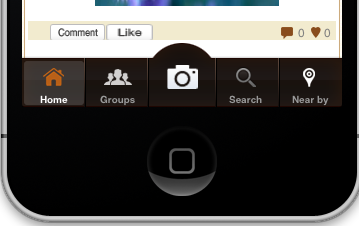
注:此图引用自 StackOverflow 13598600
如何实现呢?回到我们上面代码中的 render 函数,在函数中通过 map 将 routes 转换为 Tab 组件。我们需要做的,只是制作一个 Camera 组件,然后添加到这个数组当中。是不是很简单呢?
拦截路由行为
如何拒绝一个路由行为呢?假设有的 Tab 只有已登录用户才能访问,但是未登录的用户点击了它,怎么办?
所需要做的是修改 TouchableOpacity 的点击事件,向上面的代码那样,通过两个函数(navigationAvaliableFuncs、navigationRefusedFuncs)来处理拦截逻辑。
07/08/2018 更新
由于 React Navigation 升级到第 2 版了,可能会有一些 API 调整。但是主要的思路还是一样的。如果有些属性没有了,只需要把 navigation props 打印出来,我相信像你这么聪明的小哥一定能搞定的 :)
本文给出的自定义 Tab 的例子,应该是支持 react navigation 2 ,特性如下:
- 通过回调函数判断 Tab 点击的有效性
- TypeScript
- 支持与 react-redux 的集成